Last week I posted about my son Beckett’s fun “One Year in a Flash” themed birthday party. Both at the party, and since sharing it on the blog, people have been asking questions about how I made the baby face/party hat banner, so I thought I would share the process...
I started with the monthly photos of Beckett that I had saved on my computer. I opened each monthly photo in Photoshop, and used the Quick Selection tool to select just Beckett’s cute little face.
Because of the white background of his crib in the photos, my first attempt at the quick selection tool usually selected his face as well as some of the background, but that’s ok.
Once I had an initial selection I copied that selection (Control+C) and then opened a new Photoshop document (Control+N) and pasted the selection into the new window (Control+V). Now that I had just Beckett’s face and some of the background, I again used the Quick Selection tool to select just the background.
With the background selected, I hit the Backspace key to remove/delete the selected background elements. You might have to repeat this step a couple of times until you have selected and removed all of the unwanted background. With this step complete, I was left with just Beckett’s cute little face.
I then cropped the image down so that I didn’t have much excess space around the face.
Once cropped, I also converted the image to black and white (in the dropdown menus: Image>Mode>Grayscale). I repeated these steps with each of Beckett’s monthly photos until I had one saved for each month.
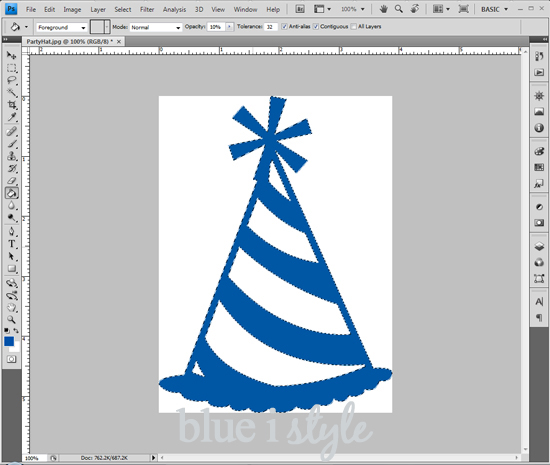
Next, I went searching online for a clipart image of a party hat that I liked, and saved the image to my computer. I then opened the party hat image in Photoshop. The image I found was black and white, but I wanted the hats to be bright colors, so I was able to simply use the Magic Wand tool to select all of the black areas of the image. Then I selected a color I wanted and used the Paint Bucket Tool to change the color of all of the black areas. To do this, you select the Paint Bucket Tool and then click on the selected area of your image.
I saved this image as a JPEG file and called it “Party Hat Aqua.” I wanted several different colors of hats (aqua, blue and green), so repeated this step several times saving a party hat image in each desired color.
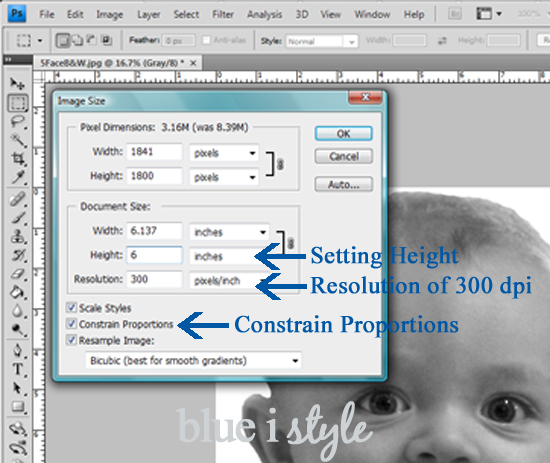
Now that I had all of my black and white faces and all of my party hats saved, it was time to get all the images sized appropriately. I wanted to be able to print the banner on my printer at home, so this meant I needed to keep the overall size of each face with hat small enough to fit on 8.5" x 11” cardstock (I could have printed on legal size with my printer to make them taller, but couldn’t find anywhere to buy legal size cardstock). After playing around with a few different sizes, I determined that the faces should each be approximately 6” high, and the hats 6.5” tall (yes, I realize that 6 + 6.5 = 12.5, which is taller than the 11 inches of my paper, but because the hat overlaps the top of the head, the finished product fits within the 11" of a letter size sheet of chardstock). I then opened each face and hat image that I had saved, and changed the image size of each accordingly (Image>Image Size), making sure that the “Constrain Proportions” box was checked. I should also note here that because I was going to be printing these fairly large, I made sure to keep the resolution of all of the images at 300 dpi.
Once I had all of my images resized, I was ready to put the faces and the hats together. I started by opening a new Photoshop doc (Control+N) and setting the document size to 8.5” x 11” (again, at 300 dpi). Also, since I was going to be printing out the final product, I made sure the Background Color was set to white and the Color Mode for the new document was set to CMYK (CMYK is the best color mode for printing, while RGB is the standard color mode for web images).
I reopened one of the monthly face photos and copied (Control+C) and pasted (Contol+V) it into my new doc, then moved the face down to toward the bottom of the doc using the Move tool (click on the Move tool, then click on the face and drag it to the desired position).
Because I ultimately wanted to hang the faces in chronological order and wanted the hats on the faces to alternate in color, I made myself a quick list of the color of hat that I wanted on each monthly face photo. Once I determine the appropriate color of hat for the face image I was working with, I opened that saved party hat image.
This time I didn’t simply copy the entire image, because if I had, the white background would have come with it. Instead, I used the Magic Wand Tool to select both the colored portion of the hat as well as the internal white sections, and then copied and pasted the entire selected area. (Alternatively, I could have put the hats on a transparent background when I first created them, but when an image is saved as a JPEG, the transparent background becomes white anyway. I could have done this if I were saving all of my images as photoshop files instead, but opted not to).
Once the hat was pasted into the same document as the face, I again used the Move tool to move the hat up until it looked appropriately positioned on top of Beckett’s head.
And there you have it - one complete black and white face with colored party hat on top ready to print. I repeated these steps for each of the monthly photos, choosing the color of hat I wanted for each month.
Once I had all of the faces with party hats complete, I decided that I also wanted to make one more banner for the basement play area - this time with orange hats. So I simply opened up all twelve of my completed face with hat images, used the Magic Wand tool to select the colored portion of the hat in each, and replaced the color of each hat with orange using the Paint Bucket tool. Then I printed out the new images with the orange hats.
After printing all of the images onto cardstock, I simply had to cut them out. I say simply - but this was nonetheless a time consuming part of the process. I can’t recommend highly enough the Cutter Bee Precision Cut Scissors. These are my FAVORITE! They are super sharp and have such a fine pointed tip that they are great for detailed cutting, such as the fringe of the party hats.
When I was ready to hang my banner, I attached two small 3M Command Strips to the wall, and strung some clear thread between them (striped Baker’s Twine in a bright color would have also been fun, but I didn’t have any of this around). Then I used mini clothes pins to clip the top of the hats along the length of the clear thread, and with that, my baby face party hat banner was complete.
Since I was using monthly photos of Beckett, I hung them in chronological order, from one month up to twelve. It was so fun to see all of his little faces as he seemingly grew up before our eyes!
A Word of Caution: When hanging the banner, I would have preferred to use clear Command strips rather than white, especially since my Command hooks were clear - HOWEVER, I recently tried the clear Command strips for another project and let’s just say they don’t come off as clean and easy as the regular, white Command strips. I was very careful about how I removed them, and still 10 of the 12 that I removed took some paint with them. After much paint touch up I decided not to trust the clear Command strips again anytime soon. I am hoping to hear that 3M makes some modifications to make the clear strips work as fabulously as the white ones - but until then I’ll have to live with seeing the white Command strips under my clear hooks. UPDATE: I have since tried the clear command strips again numerous times - and I am happy to report that they are much improved and now come of cleanly!
Are you looking for more kids' party ideas? You might be interested in these posts!
Labels: 1st birthday, baby, birthday party, DIY, entertaining, party, Photoshop


