I have a major thing for typography, so I can't get enough of letters and words in home decor. From the moment that we decided on the Vintage Preppy theme for Beckett's new room, I have had my eye on the Vintage Industrial Wall Letters from Restoration Hardward Baby & Child. My original thought was to spell out Beckett's entire name, but that would have cost me over $100, and I just wasn't willing to spend that much! As the plan for the room evolved, I decided that it might be better to include just Beckett's initials on the narrow wall next to the closet door, which would bring the cost down to $45. That was a much more manageable price tag, but the letters continued to sit my RH Baby & Child shopping cart and I just couldn't bring myself to click the order button. While $15 per letter really isn't that bad, when you are decorating an entire room every cost adds up! Nonetheless, I was still crazy for the combo of wood and metal on the letters, so I started brainstorming ways to get the same look for less.
I am pretty proud of how my knock off version turned out! The total for my three letters rang in at less than $10.00 (about $3 each), and the entire project took me less than an hour. That's a win in my book!
Here's the supply list:
- Paper Mache Letters ($2.47 each at Hobby Lobby, frequently on sale for half off)
- Wood Grain Scrapbook Paper (1 12x12 sheet per two letters, $.59 each at Hobby Lobby, frequently on sale)
- Metallic acrylic paint (Already owned; currently on sale at JoAnn's for $1.74 per bottle)
- Krylon Spray Adhesive (Already owned; available from numerous stores for about $5)
- Approximately 40 half inch finish nails per letter (Already owned; available at any hardware store for a couple of dollars)
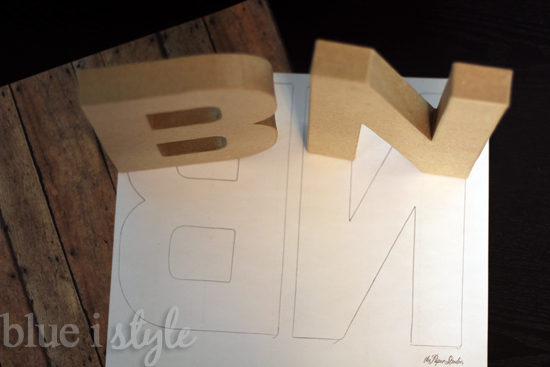
There are tons of options when it comes to purchasing craft store letters, but I selected paper mache letters from Hobby Lobby for this project because they are so similar in shape and size to the originals from Restoration Hardware.
The Restoration Hardware letters are made of solid wood, so to achieve a similar look with my paper mache letters, I picked up a couple of sheets of barnwood scrapbook paper (you'll need one sheet of paper for every two letters). I began by using a pencil to reverse trace each letter onto the back of the scrapbook paper, keeping in mind that I wanted the wood grain to run vertically.
One of the benefits of the paper mache letters (besides the great price) is that they take paint extremely well without the need to prime or do any other prep work. The Restoration Hardware letters are trimmed in an industrial metal edging that (at least in the online photos) appears to be a dark steel color, not a shiny silver. To mimic this look, I wanted to use metallic paint that I already had on hand (all Martha Stewart brand). After deciding that the Gunmetal color was a bit too dark, and that the Titanium color was too light, I began mixing the two colors until I achieved the shade I was going for. The final proportions were approximately 1 part Titanium and 2 parts Gunmetal. {I always save plastic baby food containers because they work perfectly for mixing acrylic paint!}
I painted the front and sides of each of the letters. I could have also painted the back, but since I'll be hanging these letters on the wall, it was necessary.
While the paint was drying, I returned my focus to the barnwood scrapbook paper. Since the paper would be added on top of the metallic painted letters, I needed to trim down the paper letters to give the appearance of a metal edging all the way around. I decided to reduce the each letter by a quarter of an inch all the way around. I used a ruler to measure and mark a quarter of an inch toward the inside of each letter, making marks every inch or so, with additional marks around the curves of the B and the R. Then I simply used the edge of the ruler to connect the marks along the straight sides of the letters, and free handed the curves by again connecting the dots.
I cut out each letter using my favorite Cutter Bee fine-point scissors, which are especially great for cutting detailed areas, like inside the B and the R.
With the scrapbook paper letters cut out and the paint dry on the paper mache letters, I was ready to put it all together.
I used the Krylon Spray Adhesive that I already had in my craft closet to finely coat the reverse side of each paper letter, and then placed the paper letters in the center of the paper mache letters, pressing down firmly around the edges to ensure a good hold.
At this point the letters were looking pretty good, but to make them look as similar as possible to the original Restoration Hardware letters, I needed to add the exposed nail heads. I raided my husbands tool box and discovered that we had plenty of half inch finishing nails with small silver heads that were perfect for this job.
Hammering the nails into place along the inner edge of the faux metal "trim" could not have been easier - just a couple of taps pushed the nails through the paper mache. To keep with the raw, industrial look of the original letters, I tried not the space the nails out too evenly.
I am so happy with the end result! I think my knock off version really captures the vintage industrial vibe of the original letters, and you can't beat the price! I saved about $35 by making these three letters on my own - that's more than a 75% savings! Not bad for only one hour of my time. I just love a good knock off project, don't you?!
I can't wait to hang these letters in Beckett's new room, which should be complete in just about five weeks {thanks to the One Room Challenge, I have a deadline to stick to!}. Check back later this week to see updates on some of the other projects that are starting to come together for his Vintage Preppy menswear inspired big boy room!
The links below include all of the other projects that went into the creation of the Vintage Preppy Little Gentleman's Lounge:
Labels: decor, decorating, DIY, high low, kids, knock off, One Room Challenge, paint, paper